

1-Thermographic Camera (also called an Infrared camera or Thermal Imaging Camera) is a device that forms an image using infrared radiation, similar to a common camera that forms an image using visible light. Instead of the 400–700 nanometre range of the visible light camera, infrared cameras operate in wavelengths as long as 14,000 nm (14 µm). Their use is called thermography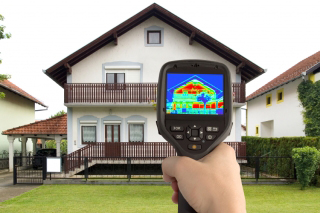 .
.
2- Non-Penetrating Meters
Non-penetrating meters are non-invasive and don’t cause any damage to a structure. They have a series of flat sensors on the bottom that measure the moisture levels between them. They’re an excellent tool for comparing the affected area to either a non-affected area or a dry standard.
3- Penetrating Meters
Penetrating meters have a series of pins that probe into a surface and give you a visual display of moisture content. They tend to be more accurate than non-penetrating meters. Most come with deep wall probes for finding trapped moisture. Some also have data logging capability.
4- Hydrosensors
Hydrosensors are invasive meters that are great for mapping out how far moisture has migrated from the source (Ex: a sump-pump backs up, so you need to know if the water has migrated to the far corner of the room.) Most will give you an audible signal letting you know where the moisture has migrated in the carpeting and carpet padding. Hydrosensors are not designed for drywall or other building materials.
5-Thermo-Hygrometers
Thermo-hygrometers help you determine whether the environment is set up to dry by examining environmental conditions of affected and non-affected outside and inside conditions. Thermo-hygrometers measure both the temperature and relative humidity in the air. These are excellent tools to help you determine if your dehumidifier is working properly. Some meters also offer dew point calculation along with GPP (Grains Per Pound).
6-Slide Hammers
This is an accessory that is used in conjunction with a penetrating meter to determine if moisture has migrated to the wood sub-flooring. The slide hammer has Teflon-coated pins that can be driven into the sub-flooring. The pins on the slide hammer will only detect moisture at the tips and not on the side—this lets you be sure you’re reading the moisture content of the sub-flooring and not the carpet or padding along the sides of the pins. This tool is great for determining how deep water has penetrated into the sub-floor, sill plates and hard wood.
7- Moisture Mapping Techniques 
Proper Meters for Wood Floor Water Damage
Different meters are calibrated to test the moisture content of different materials. Testing both concrete and wood with one type of meter produces incorrect readings. Concrete meters can only measure concrete, and wood meters can only test wood. Carry two meters to the job site if you know you will be working with both types of materials, and learn how to properly use each meter. For added convenience, some manufacturers offer models with both wood and concrete moisture meters combined into one. Know what your meter is designed to test and use it only for those materials.
Before using a concrete meter, educate yourself on its capabilities either by reading the instructions or talking to the manufacturer. Generally, both pin and pinless concrete meters qualitatively measure the relative moisture content of the slab, meaning they indicate which areas are dry and which are still wet. Know their limitations, one being that concrete meter signals can only penetrate—at the most—an inch into the material, failing to reveal moisture problems deeper in the slab that can migrate up into your flooring after it’s installed. Also, any fast-cure additives or vapor retardants added to the concrete may give your meter a false reading. Consult the manufacturer to determine if further tests are needed, such as the ASTM F 2170 test of drilling a hole into the concrete, waiting 72 hours and then measuring the moisture content with an in-situ probe or using a relative-humidity meter.
Using the right meter for wood can pose a different set of challenges from concrete. With the variety of models available on the market today, it may be difficult to know which one to choose.
Essentially, you need to know there are two basic types of wood meters: pin and pinless. Evaluate which meter best serves your needs for the type of work you do.
Pin meters feature two pins protruding from the end of the meter, between which an electric current travels and measures the moisture resistance in the wood. The pins can either be hammered or stuck into the flooring, and they must be placed in the direction of the grain for the best reading. The pins can be driven into the flooring at varying depths to determine the moisture content of each section of a particular board, making it easier to find the exact source of the moisture. Some meters feature pins insulated with latex or rubber to give a precise measurement in a specific location, which is ideal for gradient testing (measuring the moisture content of the wood at different depths of the board after installation) because the readings come only from the exact area between the ends of the pins. However, if the pins aren’t driven down all the way to the bottom of the board, or if the moisture meter is used incorrectly, a pin meter won’t detect any moisture that may be sitting at the bottom of the flooring.

Mold Remediation Services
Understanding How to Measure Moisture Can Avert Job-Site Disasters
The second type of wood moisture meter is a pinless—or nondestructive—meter, which rests on top of the flooring. It transmits low-frequency signals down into the flooring, which travel back up to register the average moisture content of the entire plank. These meters can measure up to 3/4 or 1 1/2 inches into flooring, depending on the meter. But for any flooring with thicknesses less than what the meter is designed to measure, the meter may measure the subfloor underneath and give an inaccurate reading. If you work primarily with 3/4 inch flooring, use a meter that doesn’t measure more than 3/4 inch to prevent the meter from measuring the material underneath the flooring. The pinless meters are considered more convenient because they don’t require hammering or insertion of pins and are preferable to the pin meters for prefinished flooring because they don’t leave any holes. For materials made of multiple species, such as engineered flooring or plywood, testing methods vary, so consult the flooring and moisture meter manufacturers on the proper way to test for moisture content.
2) Not Properly Maintaining the Meter
It doesn’t take much to ensure your moisture meter gives accurate readings, but there are a few things to  keep in mind for maintenance. Occasionally, the meter’s calibration can be lost, in which case you should send it back to the manufacturer for recalibration. Test your meter periodically on flooring with a known moisture content. Build up a historical record of a certain species in different seasons. If you use insulated-pin meters, be sure to change the pins frequently, since every time the pins are stuck in the floor, some of the insulation is scraped off, eventually making the meter more susceptible to inaccurate readings. The pins should be changed depending on how often they are used and for which types of species. Inspectors needing the highest level of accuracy should change the pins with every measurement. In other cases, simply look at the pins to see if any insulation has been scraped off and change the pins accordingly.
